This guide does not include traffic mirroring configuration. Clients are responsible for setting up network mirroring so the sensor can observe the relevant traffic.
Overview: What Does the Sensor Do?
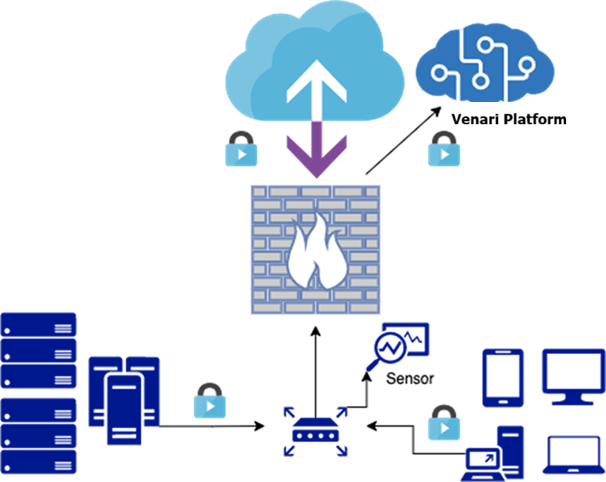
The Venari Sensor is designed to observe mirrored (copied) network traffic from your environment. The captured traffic undergoes an initial local analysis on the sensor, and only metadata is sent securely to the Venari platform for further and deeper analysis.
Corporate Network Topology
Prerequisites
Before beginning the installation:
- Capture Interface: Your VM or physical machine must be provisioned with a dedicated capture interface prior to installation. The sensor requires:
-
A management interface as the primary interface
-
A separate capture interface for mirrored traffic
-
-
Download the ISO: Ensure you have access to the latest Venari Sensor ISO image. The download link is provided by Venari Support.
-
Access Credentials: You should have received your Venari Platform UI access link and login credentials via email from Venari Support. If not, or if you've lost them, please reach out to us.
-
Network Restrictions: If your environment blocks outbound internet traffic by default, contact Venari Support to get a list of domains and ports that need to be whitelisted from your side.
The following table describes the recommended system requirements based on expected traffic volume. For higher throughput or tailored deployments, please contact Venari Support for guidance.
| CPU | Memory | Max Throughput | Disk |
|---|---|---|---|
| 4 Cores | 16 GB | 250 Mbps | 30 GB |
| 8 Cores | 32 GB | 500 Mbps | 50 GB |
| 16 Cores | 64 GB | 1 Gbps | 100 GB |
Register Your Sensor on the Venari Platform
Before installing the sensor, it must be registered in the Venari platform using your account. To do this, follow the steps below:
-
Log in to the Venari Platform UI (link provided via email)
-
Go to Settings > Sensors
-
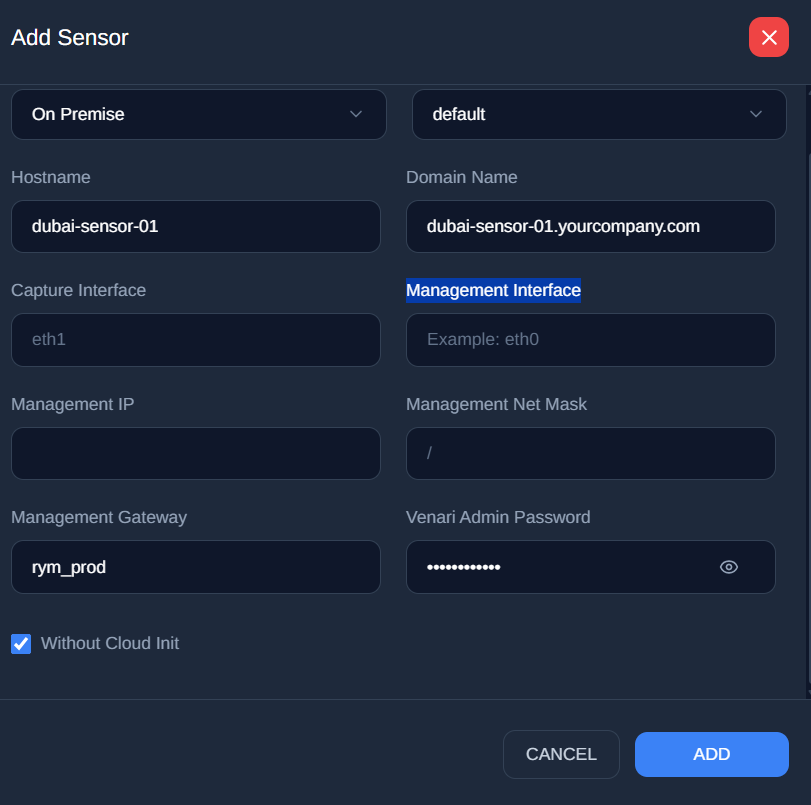
Click Add Sensor
-
Environment: On Premise
-
Site : Choose a location for your sensor (eg.
default) -
Cloud Init: Select "Without Cloud Init"
-
Hostname (e.g.
dubai-sensor-01) -
Domain Name (e.g.
yourcompany.com) → Full FQDN:dubai-sensor-01.yourcompany.com -
Capture Interface (e.g.
eth1) -
Management Interface (eg.
eth0) -
Management IP / Netmask / Gateway
-
Define the Venari Admin SSH password
-
-
Click Add
-
Copy the registration token—you'll need it during installation

Keep this token secure. It contains sensitive configuration information.
Sensor Installation Instructions
-
Boot your VM or machine from the Venari Sensor ISO image.

-
Wait for the OS installation to complete.
-
Use SSH to log in to the sensor using the following default credentials
-
Username:
venariadmin -
Password:
venariadmin
-
-
When prompted, enter the registration token

-
The sensor will auto-download and install the required packages.
-
After Deployment, the sensor instance will have:
-
A management interface for SSH, updates, and communicating with the Venari Platform backend and servers.
-
At least 1 capture interface to receive mirrored traffic
-
-
SSH as
venariadmininto the sensor again using the password you defined during registration (not the default password) and retrieve the public IP address of the sensor by following these steps:-
From the sensor console:
Support Menu → 5: Active Connectivity Checks
-
-
Send this IP to the Venari Support so it can be whitelisted.
Why?
For security, only whitelisted sensor IPs are allowed to send data to the Venari Platform backend. Without this step, the sensor won’t work, and the platform won't show any data.
Installing on AWS?
If you're deploying the sensor on AWS using CloudFormation, follow this guide instead:
How to Install a Venari Sensor on AWS Using CloudFormation
Need Help?
If you did not receive your VVP link, ISO download, or credentials—or if you're facing any issues. Please contact the Venari Support.
Thank you for securing your network with Venari.
Your sensor is now actively monitoring encrypted traffic metadata for actionable insights.